Configure LDAPS
Enable LDAPS
LDAP (389/tcp) is used to read from and write to Active Directory. LDAP is unsecured by default. To guarantee that the traffic is secure with SSL/TLS encryption, you can configure LDAPS (636/tcp). This ensures that LDAPS is enforced over LDAP. There is no graphical interface for configuring LDAPS. The LDAP service can be listed for LDAPS by installing a valid certificate on a domain controller.
As a minimum, the LDAP certificate should meet the following requirements:source
- A private key that matches the certificate is present in the Local Computer's store and is correctly associated with the certificate. The private key must not have strong private key protection enabled.
- The Enhanced Key Usage extension includes the Server Authentication (
1.3.6.1.5.5.7.3.1) object identifier (also known as OID). - The Active Directory fully qualified domain name of the domain controller (for example, dc01.contoso.com) must appear in one of the following places:
- The Common Name (CN) in the Subject field.
- DNS entry in the Subject Alternative Name extension.
- The certificate was issued by a CA that the domain controller and the LDAPS clients trust. Trust is established by configuring the clients and the server to trust the root CA to which the issuing CA chains.
- Use the Schannel cryptographic service provider (CSP) to generate the key.
Audit (ldp.exe)
Check if unsecure LDAP is enabled through ldp.exe.
- Start the Active Directory Administration Tool (
ldp.exe). - On the Connection menu, click Connect.
- Type the name of the domain controller to which you want to connect.
- Type 636 as the port number.
- Click OK.

Audit (netstat)
Check with netstat if there are connections on port 389/tcpsource.
- Open Command Prompt.
- Use the following netstat command:
Audit (Event Viewer)
Audit LDAP queries via the Event Viewer. First, make sure that the following registry item is being configured so that LDAP calls are being logged in the Event Viewer.
- Open the Registry Editor (
regedit). - Navigate to
HKEY_LOCAL_MACHINE\SYSTEM\CurrentControlSet\Services\NTDS\Diagnostics. - Set
15 Field Engineeringto2.
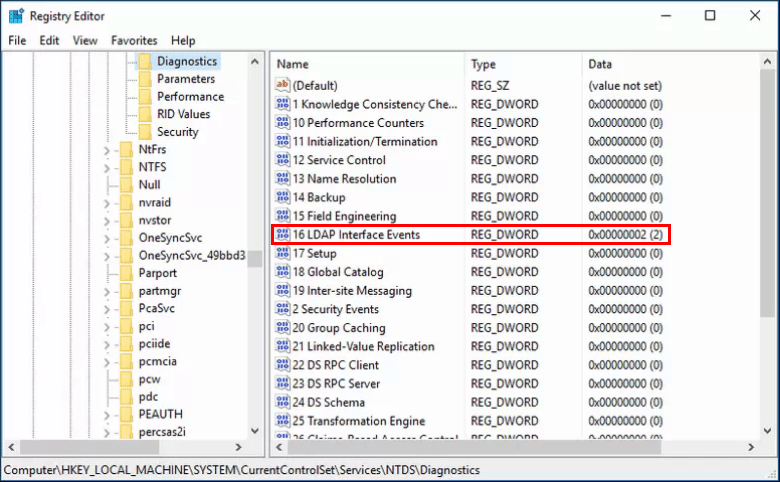
4. Reboot the server.
After the reboot, LDAP calls are logged in the Event Viewer.
- Open the Event Viewer (
eventvwr). - Navigate to
Applications and Services Logs\Directory Service - Create a filter on Event ID
2889(Unsecure LDAP binds) or on2887(Number of daily unsecure LDAP binds).
Configuration (OpenSSL)
Note
For the steps in this section, I gratefully used this source Credits for bondr007.
Configuring LDAPS does not require building a PKI environment with Active Directory Certificate Services (AD CS). With AD CS, you run a potential cybersecurity risk via poorly configured certificate templates. To configure a self-signed certificate, you need opensl. My advice is to set up an Ubuntu machine via Windows Subsystem for Linux. See the steps on how to install Ubuntu via WSL on a Windows machine here: https://ubuntu.com/tutorials/install-ubuntu-on-wsl2-on-windows-10#1-overview.
In short; your Ubuntu machine becomes the certificate authority. You will use this to create a root certificate and then issue the certificate via the root certificate, which will then be used for LDAPS.
After logging into your Ubuntu machine, you can follow the steps below to create a self-signed certificate via OpenSSL.
- Create a directory called
LDAPS.
- Create a text file named
ca_san.confwith the following contents, modifying as needed. ex: "example.com" to your domain.
[ req ]
distinguished_name = req_distinguished_name
req_extensions     = v3_ca

[ req_distinguished_name ]
# Descriptions
countryName=Country Name (2 letter code)
stateOrProvinceName=State or Province Name (full name)
localityName=Locality Name (eg, city)
0.organizationName=Your Company/Organization Name.
1.organizationName=Organizational Unit Name (Department)
commonName=Your Domain Name

# Modify for your details here or answer the prompts from openssl
countryName_default=US
stateOrProvinceName_default=Texas
localityName_default=Dallas
0.organizationName_default=My Company Name LTD.
1.organizationName_default=IT
commonName_default=example.com
[ v3_ca ]
keyUsage=critical,keyCertSign
basicConstraints=critical,CA:TRUE,pathlen:1
extendedKeyUsage=serverAuth
subjectAltName = @alt_names
# Modify for your details. Must include the commonName in the list below also.
# The *.example.com will allow all Domain controllers with
# the hostname somthing.example.com to use the cert.
[alt_names]
DNS.1 = *.example.com
DNS.2 = example.com
2. Run the following commands to create the CA key and cert. It will prompt for a password.
Note
Save the password for later use!
3. Create a ca cert with a validity of 10 years using the information provided in the file ca_san.conf, it will prompt for the password we created.
We have created two files: ca.key and ca.crt.
Next, we will add the ca.crt as a Trusted Root Certificate and create a (CSR) on a Domain Controller.
4. Log in to a Domain Controller and open an elevated PowerShell session. 5. Run the following to import it as a Trusted Root Certificate
6. Create a text file named request.inf with the following contents edited for your environment.
;----------------- request.inf -----------------
[Version]
 Signature="$Windows NT$"

;The Subject will need to be your active directory domain name
[NewRequest]
 Subject = "CN=example.com"
 KeySpec = 1
 KeyLength = 4096
 Exportable = TRUE
 MachineKeySet = TRUE
 SMIME = FALSE
 PrivateKeyArchive = FALSE
 UserProtected = FALSE
 UseExistingKeySet = FALSE
 ProviderName = "Microsoft RSA SChannel Cryptographic Provider"
 ProviderType = 12
 RequestType = PKCS10
 KeyUsage = 0xa0

[EnhancedKeyUsageExtension]
 OID = 1.3.6.1.5.5.7.3.1 ; Server Authentication
;The following will add a subject alternative name of a wildcard cert on *.example.com
;so any ad controller with a hostname of somththing.example.com can use it.
[Extensions]
2.5.29.17 = "{text}"
_continue_ = "dns=*.example.com&"
_continue_ = "dns=example.com&"
7. Next, on the Domain Controller run certreq passing in the request.inf we created and specifying the output file ad.csr.
8. Copy the ad.csr over to your machine with openssl and create a new text file named v3ext.txt with the following contents, editing the alt_names to your domain:
keyUsage=digitalSignature,keyEncipherment
extendedKeyUsage=serverAuth
subjectKeyIdentifier=hash
subjectAltName = @alt_names
#Modify for your details. Must include the commonName in the list below also.
#The *.example.com will allow all Domain controllers with
#the hostname somthing.example.com to use the cert.
[alt_names]
DNS.1 = *.example.com
DNS.2 = example.com
9. Create ad_ldaps_cert by signing the csr. 825 days is the maximum for a cert to be trusted, as dictated by the new 2019 guidelines from the CA/Browser Forumsource. This is important as MacOS has started to enforce this policy.
openssl x509 -req -days 825 -in ad.csr -CA ca.crt -CAkey ca.key -extfile v3ext.txt -set_serial 01 -out ad_ldaps_cert.crt
10. Copy ad_ldaps_cert.crt over to the machine back to the Domain Controller and accept the signed certificate.
11. We can check that the certificate has been imported by running the following powershell. We should see CN=example.com.
12. Great, now our cert is imported and ready to be used. Now we can restart the Domain Controller or create the following file and run a command to tell the Domain Controller to start using LDAPS.
13. Then run this command passing in the text file.
14. To test that we can use openssl to connect and verify, we can establish a secure connection to the Domain Controller. Or test it with ldap.exe, make sure you use port 636 and that you enable SSL.
Now, place this certificate on every Domain Controller.
User Impact
None.
Enforce LDAP Signing
Once LDAPS is configured, ensure that LDAP singing is enforced and required for every LDAP request.
Audit
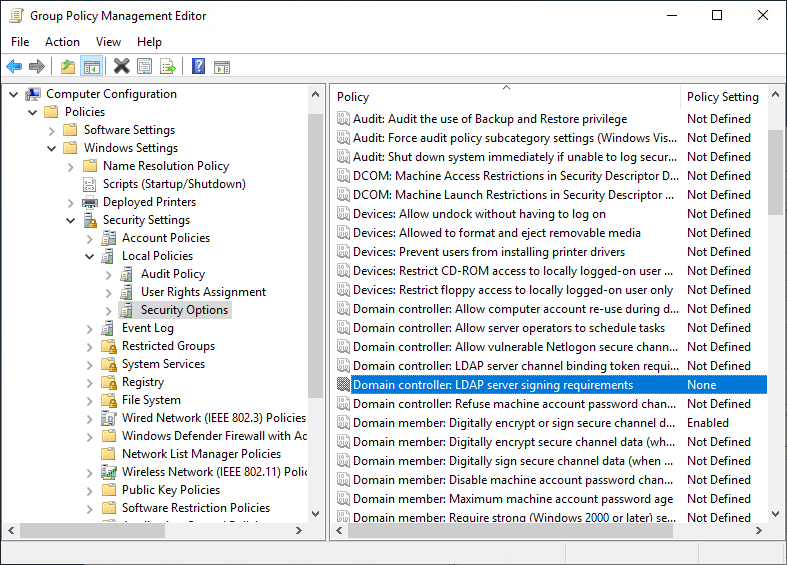
Configuration (Group Policy)
It's recommended to configure LDAP channel binding in the Default Domain Controllers Policy.
- Open the Group Policy Management Console (
gpmc.msc). - Navigate to Default Domain Controllers Policy.
- In the GPO navigate to Computer Configuration\Policies\Windows Settings\Security Settings\Local Policies\Security Options.
 Group Policy Enforce LDAPS
-
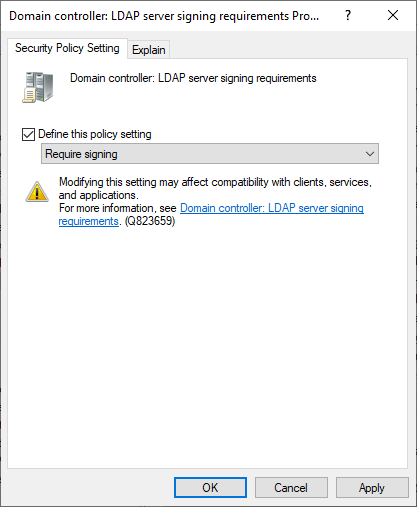
Double-click on Domain controller: LDAP server signing requirements
-
Enable Define this policy setting, and select Require signing
 Group Policy enforce LDAPS
- Select OK.
Check with ldp.exe that now only LDAPS is enforced by connecting to the Domain Controllers FQDN over port 636 with SSL enabled.
User Impact
None.
Enforce LDAP channel binding
LDAP channel binding is a protection applied for LDAP sessions over TLS (LDAPS). With channel binding, authentication is bound to the TLS channel, preventing man-in-the-middle attacks such as credential relaying attacks. As this type of attack is usually carried out over a different LDAPS channel, authentication is denied.
Audit
Configuration (Group Policy)
It's recommended to configure LDAP channel binding in the Default Domain Controllers Policy.
- Open the Group Policy Management Console (
gpmc.msc). - Navigate to Default Domain Controllers Policy.
-
In the GPO navigate to Computer Configuration\Policies\Windows Settings\Security Settings\Local Policies\Security Options.
-
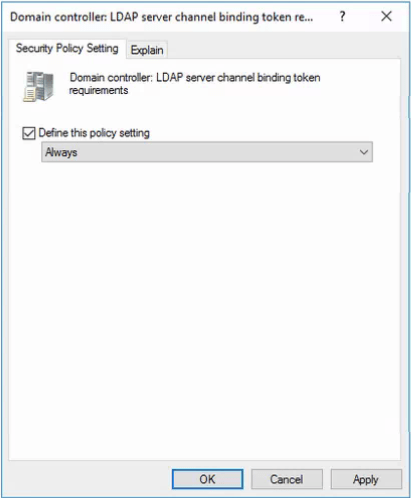
Double-click on Domain controller: LDAP server channel binding token requirements
- Enable Define this policy setting, and select Always.and then select OK.
User Impact
None.